
Build your First iOS NFT dApp with Flutter and the Fastest NodeReal NFT API
In this article, we will use the project Galxe Galaxy OAT as an example and guide you through the journey to build our NFT application with the popular cross-platform framework Flutter and NodeReal NFT API.
As NFTs continue to grow in popularity, there are more and more developers worldwide looking to get into this field.
But what exactly does it take to build a successful NFT application from scratch? In this article, I will use the project Galxe Galaxy OAT as an example and guide you through the journey to build our NFT application with the popular cross-platform framework Flutter and NodeReal NFT API. We want to write once, adopt everywhere!
Getting Started
This project is a starting point for your Web3 journey! You will be able to learn the following topics.
- What is flutter and why it is popular for developers
- Why do you need an NFT API
- How to use NFT APIs to build your applications.
A few resources to get you started if this is your first Flutter project:
Setup your environment
I assume you are using Macbook like myself, the first thing you need to do is to install your flutter.
If you are running a mac with Apple Silicon, the rosetta is a must.
sudo softwareupdate --install-rosetta --agree-to-license
Download the binary from link, and extract the file in the desired location, for example:
cd ~/development
unzip ~/Downloads/flutter_macos_3.3.1-stable.zip
Add the flutter tool to your path:
export PATH="PATH:`pwd`/flutter/bin"
Install XCode from your AppStore. Configure the Xcode command-line tools to use the newly-installed version of Xcode by running the following from the command line:
sudo xcode-select --switch /Applications/Xcode.app/Contents/Developer
sudo xcodebuild -runFirstLaunch
Make sure the Xcode license agreement is signed by either opening Xcode once and confirming or running sudo xcodebuild -license from the command line.
Clone the Project
You can clone the project from repo below.
gh repo clone nodereal/community_kb
Go to the diretory of /community_kb/Web3/03_build_the_open_web_together/nft_explorer_01, and execute command below.
open -a Simulator
flutter run
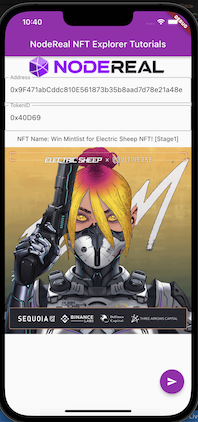
You will see the application is running on your iPhone simulator.
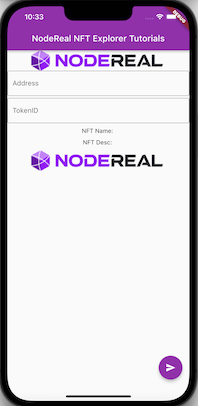
Enter the address of the contract, and the token id, the application will be like below. I am using the project Galxe Galaxy OAT as an example.
Start Coding
This is a flutter project that targets to be executable on web, Android, and iOS. After you bootstrap your flutter project, a couple of things need to be done.
- Install the JSONPRC client for dart
- Build your layout of UI
- Query the NFT metadata
- Display the NFT image
We need to install jsonrpc2 to your environment. It is very straightforward. You can execute the command below.
flutter pub add jsonrpc2
And then include the following packages into your code under lib/main.dart.
import 'package:http/http.dart' as http;
import 'package:jsonrpc2/jsonrpc2.dart';
Then it is time to build your layout of UI.
In our tutorial, to simplify, we make a very simple UI by adding widgets, it is very similar to the react. We just create a scaffold, and this scaffold, we can add appBar on the top to display the title. and then we add a body with container, in this container, a column is created to have two TextField. These two TextField are used to allow users to enter the smart contract address and token id.
Behind the body, a button is added to send the information to the NFT API to query the data by triggering the function of _retrieveNFTMetadata.
Below is the UI layout code snippet.
@override
  Widget build(BuildContext context) {
    // This method is rerun every time setState is called.
    // The Flutter framework has been optimized to make rerunning build methods
    // fast, so that you can just rebuild anything that needs updating rather
    // than having to individually change instances of widgets.
    return Scaffold(
      appBar: AppBar(
        // Here we take the value from the MyHomePage object that was created by
        // the App.build method, and use it to set our appbar title.
        title: Text(widget.title),
      ),
      body: Container(
        child: Column(
          children: [
            Image(
              image: NetworkImage('https://www.nodereal.io/static/nodereal/images/home/logo-nodereal.png'),
            ),
            TextField(
              decoration: new InputDecoration(
                border: new OutlineInputBorder(
                  borderSide: new BorderSide(color: Colors.teal)
                  ),
                  hintText: 'Your NFT Contract Address',
                  labelText: 'Address'
              ),
              controller: nftAddController,
            ),
            SizedBox(height: 5),
            TextField(
              decoration: new InputDecoration(
                border: new OutlineInputBorder(
                  borderSide: new BorderSide(color: Colors.teal)
                  ),
                  hintText: 'NFT TokenID 0x:',
                  labelText: 'TokenID'
              ),
              controller: nftTokenIDController,
            ),
            SizedBox(height: 10),
            Text("NFT Name: " + _name),
            SizedBox(height: 10),
            Image(
              image: NetworkImage(_image),
            ),
          ],
        ),
      ),
      floatingActionButton: FloatingActionButton(
        onPressed: _retrieveNFTMetadata,
        tooltip: 'Query',
        child: const Icon(Icons.send),
      ), // This trailing comma makes auto-formatting nicer for build methods.
    );
  }
Next, let`s build our function of _retrieveNFTMetaData function, it is a function to call the JSONRPC2 library to query the NodeReal NFT API.
This is the code snippet of JSONRPC2 library implementation. You need create two classes, which are HttpServerProxy and HttpBatchServerProxy, which implements the individual JSONRPC calls or batch calls.
class HttpServerProxy extends ServerProxyBase {
  /// customHeaders, for jwts and other niceties
  Map<String, String> customHeaders;

  /// constructor. superize properly
  HttpServerProxy(url, [this.customHeaders = const <String, String>{}])
      : super(url);

  /// Return a Future with the JSON-RPC response
  @override
  Future<String> transmit(String package) async {
    /// This is HttpRequest from dart:html
    var headers = {'Content-Type': 'application/json; charset=UTF-8'};
    if (customHeaders.isNotEmpty) {
      headers.addAll(customHeaders);
    }

    // useful for debugging!
    // print(package);
    var resp =
        await http.post(Uri.parse(resource), body: package, headers: headers);

    var body = resp.body;
    if (resp.statusCode == 204 || body.isEmpty) {
      return ''; // we'll return an empty string for null response
    } else {
      return body;
    }
  }

}

/// see the documentation in [BatchServerProxyBase]
class HttpBatchServerProxy extends BatchServerProxyBase {
  @override
  dynamic proxy;

  /// constructor
  HttpBatchServerProxy(String url, [customHeaders = const <String, String>{}]) {
    proxy = HttpServerProxy(url, customHeaders);
  }
}
Then you can create an object to make requests to NodeReal NFT APIs, do NOT forget to refresh the main page to display your NFT image.
Future<dynamic> _loadNFTMeta() async{
      String _url = "https://bsc-mainnet.nodereal.io/v1/{YOUR API KEY}";
      HttpServerProxy _proxy = HttpServerProxy(_url);
      var _response =  await _proxy.call("nr_getNFTMeta", [_nft_address, _nft_tokenid,"ERC721"]);;
      return _response;
  }

  void _retrieveNFTMetadata() {
    _nft_address = nftAddController.text;
    _nft_tokenid = nftTokenIDController.text;
    _loadNFTMeta().then((result) => {
        _image = (json.decode(result["meta"]))["image"],
        _name = (json.decode(result["meta"]))["name"],
        _desc = (json.decode(result["meta"]))["description"],
        _refresh(_image, _name, _desc),
    });

  }
Yeah, that is it, is it simple? As we are using the NFT API from NodeReal, it is very easy to build an NFT application, you do not need to worry about the backend service, you can only focus on your front-end code, and hand over all backend stuff to NodeReal NFT APIs!
Celebrate 1 Year of NodeReal with Special Promotion
NodeReal turns 1 year soon! We’d love to take this opportunity to thank all of you who have supported us along the way. Here’s the celebration filled with 2 month of product promotion, in-person meetups, giveaways, and more! Read more HERE.
About NodeReal
NodeReal is a one-stop blockchain infrastructure and service provider that embraces the high-speed blockchain era and empowers developers by “Make your Web3 Real”. We provide scalable, reliable, and efficient blockchain solutions for everyone, aiming to support the adoption, growth, and long-term success of the Web3 ecosystem.
Join Our Community
Join our community to learn more about NodeReal and stay up to date!